Blog Detail Log
 Spixed
//
2679 WORDS
Spixed
//
2679 WORDSBrief Introduction: Construction, renovation and some pieces of experience of this blog.
Preface: This update log is my second blog post, so I’ll stick to writing in Chinese as much as possible from this post on.
2024.2.18 22.13 补充:由于本文文字实在太多,作者决定本文不再编写英文版本,有兴趣者自行打开翻译。
2025.5.3 16:45 Update: Now I want to try again, striving not to use DeepSeek /doge Well, I used it anyway (
I. Background
2023.8, I successfully stepped into high school life. After experiencing life in 2023.Q3 & Q4, I genuinely felt the teachers’ interesting qualities (in all my years as a student, this was the first time I encountered teachers with so many catchphrases [manual/doge]). Then one day in Q4, I searched on Baidu and found a newcomer Q&A post about our school on Zhihu, where I also saw mentions of my teachers. However, I noticed that seniors’ introductions of the teachers were quite perfunctory, thus sprouting the idea to create an “archive” for them. Around 14:00 on February 13, 2024, while surfing the Internet, I suddenly had a momentary lapse of reason got inspired, combined with my previously long-cherished well-brewed idea, and decided to start another blog.
Unlike before, this marks my first time using the static site generator Hugo (link at bottom), my first attempt at modifying a relatively well-developed theme (modified version link at bottom, original version link here), my first time writing articles with purely hand-coded Markdown, my first time hosting blog services via GitHub Repo & GitHub Pages… These countless “firsts” also became the driving force behind my determination to persist with this endeavor.
26.2.15: Due to the original theme code being too smelly and long, maintenance was a disaster, so I abandoned the Tony theme and started building a new theme. The following text was heavily revised today to detail the construction process of the new theme.
II. Building
(The following section contains technical details only programmers would care about. Non-techies please scroll down quickly – this part will be lengthy. If you see the table of contents navigation on the left, click to jump to the next part)
At this time last year, when I had just owned a server for a few months, I attempted to build dynamic blogs using Halo and WordPress. I tried Halo because I found it comfortable to use, while installing WP was purely due to its fame.
Initially, considering that Vercel and Netlify-built sites are currently inaccessible in China, and Gitee requires real-name verification, my first thought was to freeload utilize GitHub Actions computing power to build my blog with Halo. (Though I soon learned GitHub Actions can’t sustain persistent hosting, at least not in the free tier) So I did some Baidu research and settled on the Hugo(with the theme Tony) route.
At the time, I didn’t know GitHub.io was inaccessible via mobile networks in China. Only when ver.0.1-dev was released and I tried accessing it back home did I realize… pretty speechless
2024.2.18 16:34 update: Just discovered Netlify is now fully accessible in China… But since I don’t own a domain name, I plan to build a backup access address on Netlify today.
2024.2.18 22:14 update: Probably won’t make it today. Try again tomorrow.
(1.1) Installation - Traditional Method
1. VSCode
The main reasons for choosing it are: VS Code is truly lightweight – its disk space usage, memory consumption, and startup speed are on a completely different level compared to WebStorm. Secondly, since Hugo (the static site generator) handles most heavy lifting, writing articles doesn’t require much coding but demands better Markdown support. Hence, VS Code is the optimal choice.
Official site: https://code.visualstudio.com
Stable Windows 64-bit Admin-unsupported: https://code.visualstudio.com/sha/download?build=stable&os=win32-x64-user
Insiders official site: https://code.visualstudio.com/insiders/
Insiders Windows 64-bit Admin-unsupported: https://code.visualstudio.com/sha/download?build=insider&os=win32-x64-user
Rest assured to open – 1200% official latest version links.
Avoid Baidu searches – a single page of Baidu results is full of fake links. Unless you have my eagle-eyed discernment, better not use Baidu.
After downloading, open the installer and just click Next mindlessly.
Author's Warm Reminder: NEVER modify the installation path! The provided installers don't support admin privileges, so don't even think about installing VS Code in C:\Program Files etc. Don't ask how I know – and even if you do, I'll never tell you I spent 10 minutes installing VSCode because of this...
26.2.15 14:22 Update: Nowadays, AI IDEs are blossoming everywhere. There are many kinds of IDEs on the market, but 90% are based on VSCode, so you can use other IDEs. The subsequent steps are basically the same, and some can even be done with AI help.
After installation, launch VS Code and configure it.
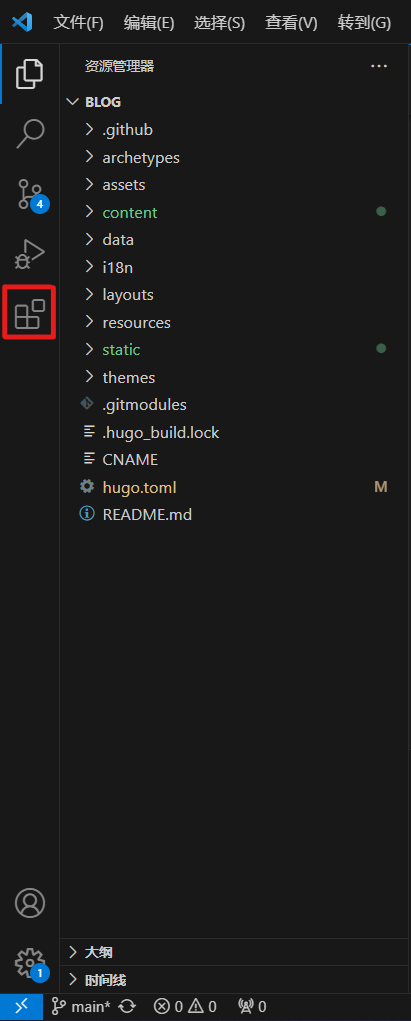
Enter Extensions interface via the position shown below or using Ctrl+Shift+X shortcut:
Install these extensions (copy-paste extension names into search box, or open links to install via official site):
Not including extension icons here. Recommend installing directly through links. Verify VS Code official domain: visualstudio.com
| Extension Name | Link |
|---|---|
| Chinese (Simplified) (简体中文) Language Pack for Visual Studio Code | https://marketplace.visualstudio.com/items?itemName=MS-CEINTL.vscode-language-pack-zh-hans |
| Markdown All in One | https://marketplace.visualstudio.com/items?itemName=yzhang.markdown-all-in-one |
| Markdown Preview Github Styling | https://marketplace.visualstudio.com/items?itemName=bierner.markdown-preview-github-styles |
| Even Better TOML | https://marketplace.visualstudio.com/items?itemName=tamasfe.even-better-toml |
After installing the first Simplified Chinese Language Pack, you will be prompted to restart VSCode. It is recommended to restart before proceeding with the next installation.
26.2.15 Update: When typing this text, the author is using Trae, an editor that natively supports Chinese and Markdown file preview, so only the Even Better TOML plugin needs to be installed for a better configuration file editing experience.
VSCode installation complete.
2. Git
Since I’m using GitHub for hosting, configuring Git is essential for convenient local-cloud file synchronization. Git itself is a command-heavy and bewildering CLI program, so this article will only cover partial commands. If issues arise, please don’t ask me – chances are I can’t solve them either.
This guide is for Windows only. macOS & Linux/Unix users click respective links for official installation guides.
Git official site: https://git-scm.com/
Windows download page: https://git-scm.com/download/win
Windows v2.43.0 64-bit: https://github.com/git-for-windows/git/releases/download/v2.43.0.windows.1/Git-2.43.0-64-bit.exe
After downloading, click Next once to accept the license, choose installation path, then follow recommended settings shown in images below (you can also keep defaults except for the first image). Continue clicking Next.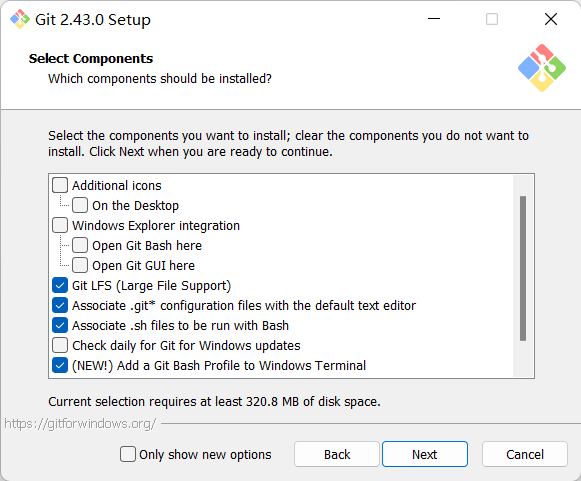
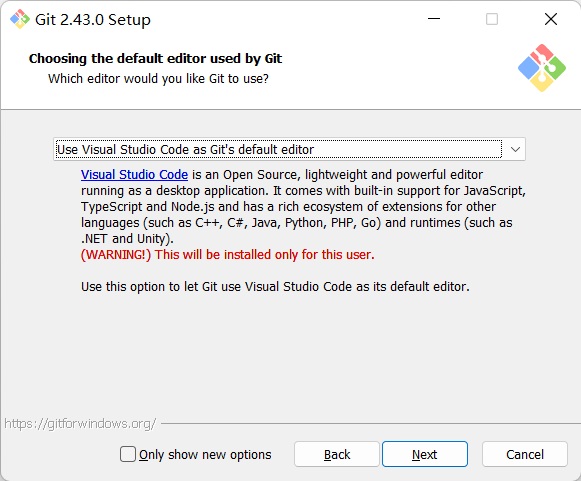
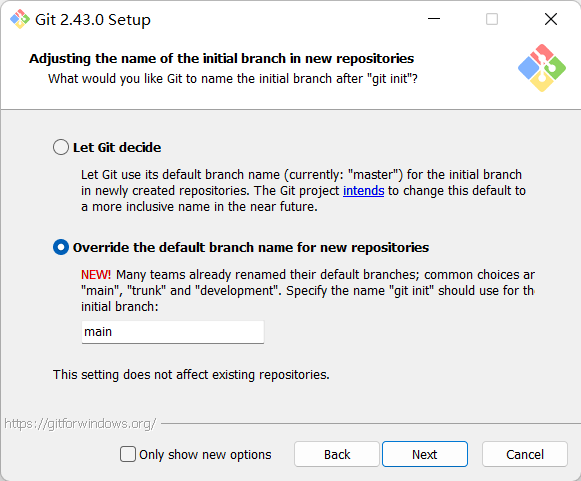
When installation completes, remember to uncheck both “Launch Git Bash” and “View Release Notes”, then click Finish. Next steps:
- Reboot your PC (or restart “Windows Explorer” via Task Manager) to refresh PATH environment variable
- Open PowerShell and run
git --version - If version info appears (git version 2.43.0.windows.1), Git is successfully installed.
3. hugo
Author's Warm Reminder: MUST download hugo_extended version, otherwise many Hugo features will be unavailable! I actually got this right, the red text is just to warn you all.
Also, the following operations involve accessing GitHub. Consider “scientific internet access” based on your local network conditions.
GitHub Releases: https://github.com/gohugoio/hugo/releases/
0.155.3 https://github.com/gohugoio/hugo/releases/download/v0.155.3/hugo_extended_0.155.3_windows-amd64.zip
Due to limited time/energy, my current theme (as of 2026.2.15) only guarantees compatibility with Hugo Extended v0.151.0 ~ 0.155.3. For issues, wait for my random free time/post-college-entrance-exam availability.
After downloading, unzip to a comfortable location. Add this path to system PATH, reboot or restart Explorer to refresh PATH. Open PowerShell (abbreviated as ps later) and run hugo help. If help content displays normally, installation succeeds.
(1.2) Installation - Non-Traditional Method
When I want to use a package manager on Windows, how would you respond, dear reader? [manual/doge]
Here we’ll use Chocolatey as an example. While winget and scoop are similar, based on official documentation, I personally find Chocolatey the most fragrant option.
Open PowerShell as Administrator and run:
The following operations involve accessing overseas services. If commands hang, prepare for “scientific internet access”.
Set-ExecutionPolicy Bypass -Scope Process -Force; [System.Net.ServicePointManager]::SecurityProtocol = [System.Net.ServicePointManager]::SecurityProtocol -bor 3072; iex ((New-Object System.Net.WebClient).DownloadString('https://community.chocolatey.org/install.ps1'))After execution, verify installation with choco -V (may need to reopen PowerShell).
Proceed with:
choco install -y vscode git hugo-extendedWait for completion.
Of course, VS Code still requires manual configuration post-installation.
So… does this approach give you that particular feeling?
(2) (Optional) Configure Comment Section
Currently, the Polymer theme only supports the Waline comment system.
Waline is a concise, safe comment system. Its features include fast, truly safe, Markdown syntax support, lightweight and easy to use, free deployment, multiple deployment methods and storage service support, etc.
As of 26.2.15, the server and database can be deployed for free on Vercel. Please refer to here for deployment tutorials or watch bilibili video. The official website is very detailed, so I won’t repeat it here. After deployment is complete, please remember your comment system URL (https://waline.yourdomain.com/), which will be needed for the blog configuration file later.
Of course, you can also choose not to enable the comment section, just modify one line of configuration when introducing the configuration file later.
(3) Create blog
1. Local Build
Find a location for your blog folder (no need to create it manually), then run in ps:
hugo new site blogThe site name after
hugo new site(official term) can be replaced, and all subsequentblogdirectories will be replaced with your input.
Then ignore Hugo’s output in ps, directly cd into the blog folder and run:
git init
git submodule add https://github.com/Spixed/polymer.git themes/polymer**Author's Warm Reminder: If enabling proxy, please use virtual network card mode; if using system proxy, please follow these steps** (Win10+ example, can skip step 1 if using Clash series without changing system proxy address): 1. Open Settings > Network & Internet > Proxy, find "Use a proxy server" under Manual proxy, click Edit on the right, copy IP and port 2. Summon ps, run: ```powershell git config --global http.proxy http://127.0.0.1:7890 git config --global https.proxy http://127.0.0.1:7890 ``` > Change the address to `http://your_ip:your_port`. If using Clash series without modifications, run directly. To disable proxy: ```powershell git config --global --unset http.proxy git config --global --unset https.proxy ```This initializes Git for the folder and adds theme Polymer as a submodule. This operation involves accessing GitHub - if it’s slow or errors occur, remember to enable proxy.
Actually, this step can already be done in VSCode. Right-click the folder and select “Open with VSCode”, or open VSCode, File > Open Folder, or open VSCode, press
Ctrl + K, wait for loading, thenCtrl + Shift + \\to summon the terminal (default is powershell, or the newer pwsh)
Now we officially need VSCode’s assistance. Open VSCode to the blog folder, locate hugo.toml in the root directory, and configure it as follows:
baseURL = "your_blog_url" # Your blog homepage URL
languageCode = "en" # Language used by the blog, "en" / "zh"
title = "Polymer Grid" # Blog title
theme = "polymer" # Theme, must be set to this

[languages] # Multi-language configuration, no need to change if not necessary
[languages.en]
 languageName = 'English'
 contentDir = 'content/en'
 weight = 1
[languages.zh]
 languageName = '中文'
 contentDir = 'content/zh'
 weight = 2

[params]
description = "A Digital Brutalism Theme" # Blog description, generally not important
math = true # Whether to enable support for mathematical formulas
mathEngine = "mathjax" # Math formula engine, "mathjax" / "katex"
favicon = "https://api.dicebear.com/7.x/bottts/png?seed=Polymer" # Blog favicon, square image recommended

[params.waline]
enable = true # Whether to enable waline comment system
serverURL = "your_waline_server_url" # Set waline server address, no need to set if not enabled

[taxonomies]
category = "categories" # Category
tag = "tags" # Tag

[markup]
[markup.goldmark]
 [markup.goldmark.renderer]
   unsafe = true # Whether to enable HTML tag rendering. Enabling may cause security issues, not enabling prevents HTML tag rendering
 [markup.goldmark.extensions]
   [markup.goldmark.extensions.passthrough] # Configure Passthrough extension to use LaTeX in Markdown. Must be configured as follows if math is enabled.
     enable = true # Whether to enable Passthrough extension
     [markup.goldmark.extensions.passthrough.delimiters]
       block = [['$$', '$$'], ['\\[', '\\]']] # Block formula delimiter
       inline = [['$', '$'], ['\\(', '\\)']] # Inline formula delimiter
Then go to data/author.toml file and edit author information. This blog theme supports multiple authors, and each author needs to be configured in this file.
[alex] # Author configuration item, alex is Author ID, customizable, unique
 name = "Alex Bold" # Author name
 nickname = "Alex" # Author nickname
 avatar = "https://api.dicebear.com/7.x/avataaars/png?seed=A&size=128" # Author avatar, square image recommended
 bio = { en = "A digital explorer loving brutalist designs.", zh = "热爱粗野主义设计的数字探索者。" } # Author motto, write one for English and one for Chinese
 github = "https://github.com/example" # Author GitHub account
 website = "https://example.com" # Author personal website
 email = "alex@example.com" # Author email
 weight = 1
After saving with Ctrl + S, press Ctrl + Shift + \\ to summon VSCode’s terminal, run hugo server -D for a test. Open your browser to localhost:1313 (or 127.0.0.1:1313) - if the page displays properly (meaning you find it aesthetically pleasing with no visual inconsistencies), then your local setup is complete.
2. Uploading to GitHub
From this step onward, you might need to engage in “extracurricular learning” - make sure your “learning budget” is sufficient manual/doge
Visit GitHub. If you have an account, log in. Otherwise, refer to this guide (it’s too comprehensive for me to repeat )
Create a new repository. If you plan to use https://[username].github.io as your blog’s baseURL, name the repository [username].github.io (replace [username] with your GitHub username). Then return to VSCode and set your user signature in the terminal:
git config --global user.name [username]
git config --global user.email [email]
While the username and email set here don’t directly affect git push operations, the author still recommends keeping them consistent with your GitHub account.
Then return to the hugo.toml file editor, replace [your_blog_root_URL] and [your_github_homepage] with [username].spixed.io and https://github.com/[username], then save.
Create a new file at this path: ./.github/workflows/hugo.yaml, open it, copy the following text into the file, and save.
# Sample workflow for building and deploying a Hugo site to GitHub Pages
name: Deploy Hugo site to Pages

on:
# Runs on pushes targeting the default branch
push:
 branches:
   - main

# Allows you to run this workflow manually from the Actions tab
workflow_dispatch:

# Sets permissions of the GITHUB_TOKEN to allow deployment to GitHub Pages
permissions:
contents: read
pages: write
id-token: write

# Allow only one concurrent deployment, skipping runs queued between the run in-progress and latest queued.
# However, do NOT cancel in-progress runs as we want to allow these production deployments to complete.
concurrency:
group: "pages"
cancel-in-progress: false

# Default to bash
defaults:
run:
 shell: bash

jobs:
# Build job
build:
 runs-on: ubuntu-latest
 env:
   HUGO_VERSION: 0.155.3
 steps:
   - name: Install Hugo CLI
     run: |
       wget -O ${{ runner.temp }}/hugo.deb https://github.com/gohugoio/hugo/releases/download/v${HUGO_VERSION}/hugo_extended_${HUGO_VERSION}_linux-amd64.deb \
       && sudo dpkg -i ${{ runner.temp }}/hugo.deb
   - name: Install Dart Sass
     run: sudo snap install dart-sass
   - name: Checkout
     uses: actions/checkout@v4
     with:
       submodules: recursive
       fetch-depth: 0
   - name: Setup Pages
     id: pages
     uses: actions/configure-pages@v5
   - name: Install Node.js dependencies
     run: "[[ -f package-lock.json || -f npm-shrinkwrap.json ]] && npm ci || true"
   - name: Build with Hugo
     env:
       HUGO_CACHEDIR: ${{ runner.temp }}/hugo_cache
       HUGO_ENVIRONMENT: production
       TZ: America/Los_Angeles
     run: |
       hugo \
         --gc \
         --minify \
         --baseURL "${{ steps.pages.outputs.base_url }}/"
   - name: Upload artifact
     uses: actions/upload-pages-artifact@v3
     with:
       path: ./public

# Deployment job
deploy:
 environment:
   name: github-pages
   url: ${{ steps.deployment.outputs.page_url }}
 runs-on: ubuntu-latest
 needs: build
 steps:
   - name: Deploy to GitHub Pages
     id: deployment
     uses: actions/deploy-pages@v4
Then return to the terminal and run:
git add .
git commit -m "first commit"
git branch -M main
git remote add origin https://github.com/[username]/[username].github.io.git
git push -u origin main
When running the last command above for the first time, you will be prompted to enter your account and password. Please enter the username and password you set when registering your GitHub account, then confirm. You will not be asked to log in again when running git push in the future.